How to Apply Press-On Nails Properly: The Complete Guide
Press-on nails have come a long way from the thick, obviously fake nails of the past. Today’s press-ons look remarkably natural and can last just as long as a salon manicure when applied correctly. The key word there is “correctly”—the difference between press-ons that pop off the next day and ones that last two weeks comes down to proper application technique. Let’s walk through exactly how to apply press-on nails for maximum longevity and a flawless finish.
Why Application Technique Matters
You might think press-on nails are foolproof—just peel and stick, right? In reality, proper application is what separates a manicure that lasts hours from one that lasts weeks. The nail industry has developed precise techniques that create a bond between your natural nail and the press-on that rivals professional gel manicures.
Poor application leads to several common problems. Air bubbles under the nail create weak spots where water can seep in, loosening the adhesive. Improper sizing means the press-on doesn’t sit flush against your natural nail, creating lift points where the nail will pop off. Oil or moisture on your natural nail prevents proper adhesion from the start. Taking shortcuts during prep work almost always results in premature nail loss.
When you apply press-ons properly, they can last anywhere from one to three weeks depending on your lifestyle and nail care. That’s impressive longevity for a product you can apply at home in 30 minutes. The investment of time in proper application pays off with days or weeks of beautiful nails.
What You’ll Need Before You Start
Gathering all your supplies before you begin makes the process smooth and prevents you from rushing steps while adhesive is drying. You’ll need your press-on nail kit, which should include the nails in various sizes and either adhesive tabs or nail glue. Most quality kits include both options.
Additional supplies you’ll need include a nail file and buffer for prep work, nail clippers or scissors for trimming your natural nails, a cuticle pusher or wooden stick for pushing back cuticles, rubbing alcohol or acetone for cleaning nails, cotton pads or balls for application, and optionally, a nail dehydrator or primer for extra staying power.
Having good lighting is crucial—you need to see what you’re doing to avoid gaps and ensure proper placement. Work at a table or desk where you can rest your hands comfortably. Give yourself at least 45 minutes for your first application so you’re not rushing. Once you’ve done it a few times, you’ll get faster.
Preparing Your Natural Nails: The Most Important Step
Nail preparation is where most people cut corners, and it’s where applications fail. This step is absolutely critical and deserves as much time and attention as actually applying the press-ons. Start by removing any existing nail polish completely using acetone-based remover. Even small traces of old polish will prevent proper adhesion.
Wash your hands thoroughly with soap and water, making sure to scrub around and under your nails. You want to remove all oils, lotions, and dirt. Dry your hands completely—water is adhesive’s enemy. Push back your cuticles gently using a cuticle pusher or wooden stick. This creates more surface area on your nail for the press-on to adhere to. Don’t cut your cuticles unless absolutely necessary, but do push them back so they’re not in the way.
Trim your natural nails as short as possible without causing discomfort. Shorter natural nails provide a flatter surface for press-ons and reduce leverage that can cause lifting. Use a nail file to shape the edges and smooth any rough spots. Here’s the crucial step many people skip: buff the surface of your natural nails very lightly with a buffer. This removes the natural oils and shine from your nail plate, creating a slightly rough surface that adhesive can grip. Don’t buff so hard that you thin your nails—just enough to remove the shine.
After buffing, clean your nails thoroughly with rubbing alcohol or acetone on a cotton pad. Wipe each nail, making sure to cover the entire surface. This removes any remaining oils, dust from buffing, and moisture. Let your nails air dry for a minute or two. This cleaning step is the secret to long-lasting press-ons. Your nails should look completely matte and feel slightly dry to the touch.
Sizing Your Press-On Nails
Proper sizing is the difference between press-ons that look natural and ones that look obviously fake. Most kits come with 24 to 30 nails in various sizes. Lay out all the nails and organize them by size to make selection easier. Start by finding the right size for each nail before you apply any adhesive.
Hold a press-on nail up to your natural nail without attaching it. The press-on should cover your entire nail from side to side without touching the skin on either side. If it touches your skin, it’s too big and will cause irritation and lifting. If it doesn’t cover the full width of your nail, it’s too small and won’t look natural. The perfect fit sits just barely short of your skin on both sides—maybe a millimeter of space.
Check the cuticle area carefully. The press-on should sit close to your cuticle without actually touching it. A tiny gap is fine and actually preferred—press-ons sitting directly on cuticles will lift quickly. At the tip of your nail, the press-on can extend past your natural nail as far as you like, though most people prefer a modest extension for durability.
Size all ten nails before you start applying. Lay them out in order so you can grab the right size quickly once you start working with adhesive. If you’re between sizes, go with the smaller option—you can file the sides of a slightly small press-on to make it fit, but you can’t make a too-large nail smaller without affecting its appearance.
Some people have nails that vary significantly in width. Don’t assume that because your index finger takes a size 4, your other fingers will follow a pattern. Size each finger individually. Taking five minutes to get sizing perfect saves you from wonky-looking nails or premature popping.
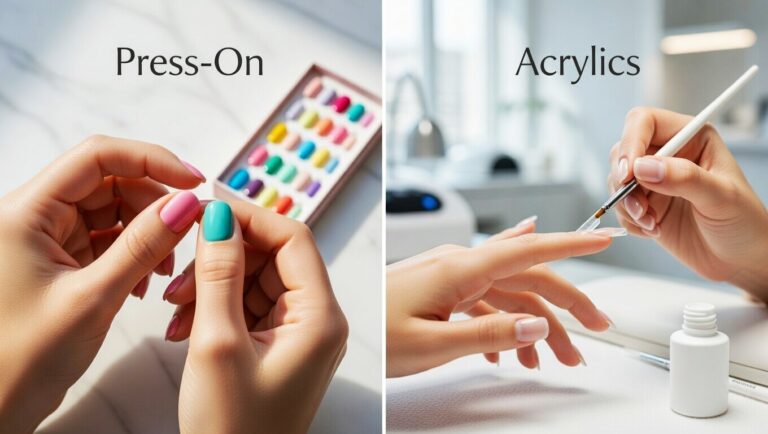
Adhesive Tabs vs Nail Glue: Choosing Your Method
Press-on nails can be applied with adhesive tabs or nail glue, and each method has distinct advantages. Adhesive tabs are pre-cut sticky strips that you place on your natural nail before pressing on the artificial nail. They’re perfect if you want to remove your press-ons after a few days or if you like changing your nail look frequently. Tabs are also great for beginners because they’re more forgiving—if you mess up placement, you can pull the nail off and try again within the first few seconds.
The downside of tabs is shorter wear time. Most adhesive tabs last three to seven days, sometimes up to ten days with perfect application and careful wear. They’re more prone to popping off with water exposure or heavy hand use. However, tabs are much gentler on your natural nails and leave no damage when removed.
Nail glue creates a stronger, longer-lasting bond. With proper application, glue can keep press-ons secure for two to three weeks. The bond is water-resistant and holds up better to daily activities. Nail glue is the choice if you want your press-ons to last as long as possible or if you have a particularly active lifestyle.
The drawbacks of glue include more difficult removal that requires soaking, less room for error during application since the bond is immediate and strong, and potential damage to natural nails if removed improperly. The choice depends on your priorities: convenience and nail health versus maximum longevity.
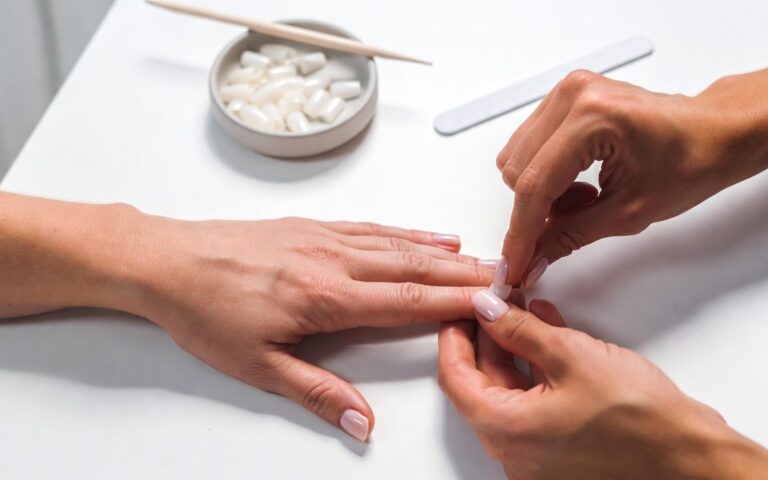
Applying Press-Ons with Adhesive Tabs
If you’re using adhesive tabs, select the right size tab for each nail just like you did with the press-on nails themselves. The tab should cover most of your natural nail but not touch the skin around the edges or your cuticle. Peel the backing off one side of the tab and press it firmly onto your natural nail, starting at the cuticle area and smoothing toward the tip. Use a cuticle stick or your finger to press out any air bubbles—the tab should be completely smooth and flat.
Leave the protective film on the other side of the tab until you’re ready to apply the press-on. When you’re ready, peel off the top film and immediately position your press-on nail. Start at the cuticle end, placing it at a 45-degree angle, then lower it down slowly. This technique helps prevent air bubbles. Once positioned, press down firmly for at least 30 seconds, applying pressure across the entire nail.
Pay special attention to the edges and tip—these are the most common lift points. Press firmly around the perimeter of the nail, and use your other thumb to apply pressure to the center. Some people find it helpful to hold each nail for a full minute to ensure maximum adhesion.
Work on one hand completely before starting the other. This prevents you from accidentally bumping wet adhesive with your other hand. Once you’ve applied all the nails on one hand, go back and press each one again for another 30 seconds. This extra pressing significantly improves adhesion.
Applying Press-Ons with Nail Glue
Nail glue requires more precision because the bond is instant and permanent. Have everything ready before you start because once you apply glue, you need to work quickly. Apply a small drop of glue to your natural nail—you need less than you think. A drop about the size of a rice grain is sufficient. If you use too much, glue will ooze out the sides when you press the nail down, creating a mess and potentially gluing your skin.
Some people prefer to apply a tiny amount of glue to both the natural nail and the back of the press-on for extra hold. If you do this, use even less on each surface—two thin layers work better than one thick one. Position the press-on nail at your cuticle line at a 45-degree angle, then slowly lower it down, pressing firmly as you go. This rolling motion pushes air out from under the nail as you apply it.
Once the nail is positioned, hold it in place with firm, steady pressure for 30 to 60 seconds. Don’t wiggle or adjust the nail—once glue touches, the bond begins immediately. Apply pressure across the entire surface, not just the center. Use your thumbnail to press along the edges and tip.
If glue oozes out the sides, don’t touch it with your fingers—you’ll glue your fingers together or to the nail. Let it dry for a few seconds, then gently wipe it away with a cotton swab dipped in acetone. Work quickly but carefully because you can’t reposition nails applied with glue. If you mess up placement, you’ll need to soak that nail off and start over with a fresh press-on.
The Critical First Hour
The first hour after application is crucial for longevity, regardless of which adhesive method you use. During this time, the bond is still setting and strengthening. Avoid water completely for at least one hour, preferably two. Don’t wash your hands, do dishes, or shower. Water exposure too soon is the number one reason press-ons pop off prematurely.
Keep your hands relatively still and avoid putting pressure on your nails. Don’t test them by pressing on them or flexing them to see if they’re secure. Every time you apply pressure during this setting period, you potentially weaken the bond. Avoid any activities that might bump or catch your nails.
Some nail professionals recommend waiting even longer—four to six hours—before water exposure for absolute maximum adhesion. If you can apply your press-ons at night and avoid water until morning, you’ll get the best possible bond. This is when the adhesive fully cures and reaches maximum strength.
Resist the urge to “fix” any nails during this period. If a nail doesn’t feel perfectly secure, leave it alone for the full hour before assessing whether it actually needs attention. Often what feels loose is just your awareness of having something new on your nails.
Filing and Shaping
Once your press-ons are securely applied and you’ve waited the appropriate time, you can file and shape them to your preference. Use a regular nail file to shorten the length if desired. File in one direction rather than sawing back and forth—this prevents the press-on from loosening at the base.
You can reshape the sides and tips to create your preferred nail shape. Want to change square nails to almond? File away. Just be careful not to file the base where the press-on meets your natural nail—this can create a lift point. Focus your filing on the free edge.
Some people like to very lightly buff the surface of press-on nails to remove any shine and create a more natural look. If you do this, be extremely gentle—press-ons are thinner than acrylics and can be filed through if you’re too aggressive. Buffing also allows you to apply regular nail polish on top of press-ons if you want to customize the color.
After filing, wipe away any dust with a damp cloth. You can also clean around the edges where the press-on meets your skin to remove any adhesive residue for a cleaner look.
Making Your Press-Ons Last Longer
Proper application is just the beginning—aftercare determines how long your press-ons actually last. For the first 24 hours, treat your nails gently. Avoid hot water, which can soften adhesive, and wear gloves if you must do any wet work. After the first day, always wear rubber gloves when washing dishes, cleaning, or doing anything involving prolonged water exposure.
Keep your nails and cuticles moisturized with cuticle oil, but avoid getting oil under the press-on nails. Apply oil carefully around the cuticles and on the sides of your nails. Moisturized cuticles prevent lifting at the base. Don’t use your nails as tools—open cans, peel stickers, or scratch things with your fingertips instead of your nail tips. Press-ons are strong but not indestructible.
If you notice a nail starting to lift at the edge, address it immediately. Apply a tiny drop of nail glue under the lifting area and press firmly for 30 seconds. Catching lifting early prevents the entire nail from popping off. Some people keep a small bottle of nail glue in their purse for emergency repairs.
Avoid harsh chemicals like acetone-based nail polish remover, which can dissolve the adhesive. If you want to change the polish on your press-ons, use non-acetone remover. Be cautious with hand sanitizer and alcohol-based products—frequent use can weaken adhesive over time.
Common Application Mistakes and How to Fix Them
Even with careful application, mistakes happen. If you trap an air bubble under a press-on nail, you’ll see a white or cloudy spot. With adhesive tabs, you can sometimes remove the nail immediately and reapply. With glue, you’re usually stuck with it. Prevention is key—press firmly from center to edges during application to push air out.
If a press-on is sized wrong and touches your skin on the sides, it will cause irritation and lifting. If you notice this immediately after application, remove the nail and select a smaller size. If you don’t notice until later, you can carefully file the sides of the press-on to create space, but this works better with larger, sturdier press-ons.
Glue on your skin is a common issue. If you get glue on the skin around your nail, let it dry completely, then gently file or buff it off. Don’t try to wipe wet glue—it will spread and make things worse. For dried glue on skin, you can also soak the area in warm soapy water to soften it, then gently remove it.
A press-on nail that pops off within the first day indicates an application problem, usually insufficient prep or improper sizing. If you experience this, remove all the nails, start over with thorough prep, and pay closer attention to sizing and adhesive application.
How to Handle Different Nail Shapes
Different press-on nail shapes require slightly different application techniques. Square and coffin-shaped nails are the easiest to apply because they have a flat, even surface. Focus on pressing the entire tip firmly to ensure the corners adhere properly—corners are common lift points on square shapes.
Almond and stiletto nails have tapered points that require extra attention. The narrow tip area needs firm pressure to ensure adhesion. Be careful not to bend or flex the pointed tip during application, as this can cause the nail to lift at the base. When filing stiletto or almond nails, support the base with your other hand to prevent flex.
Round and oval nails follow the natural curve of your nail bed more closely, making them relatively easy to apply. The key with these shapes is ensuring the curved edges match your natural nail’s curve. If there’s a mismatch, you’ll see gaps that allow water penetration.
Duck or flare nails, which are wider at the tip, need special attention at the sides. Make sure the flared edges are firmly adhered, and consider using a bit of extra glue at these points if you’re using the glue method.
Removing Press-On Nails Safely
Proper removal is just as important as proper application for maintaining healthy natural nails. Never peel or force press-ons off—this can damage your natural nail plate, causing peeling and weakness. For press-ons applied with adhesive tabs, soak your nails in warm soapy water for 10 to 15 minutes. The water will soften the adhesive, allowing you to gently wiggle the press-ons off. Use a wooden cuticle stick to carefully lift the edges if needed.
For glue-applied press-ons, you’ll need acetone. Pour pure acetone into a bowl and soak your nails for 15 to 20 minutes. The acetone dissolves the glue. You can speed up the process by wrapping each nail in acetone-soaked cotton and aluminum foil—this keeps the acetone in contact with the glue. After soaking, the press-ons should slide off easily. If they don’t, soak for another five minutes rather than forcing them.
Once the press-ons are off, wash your hands thoroughly and apply cuticle oil and hand cream generously. Your natural nails may look slightly dry or feel tender after removal—this is normal. Give your nails a break for at least a few days before applying a new set. During this break, focus on moisturizing and strengthening your natural nails.
If you plan to reuse your press-ons, clean them immediately after removal. Scrape off old glue or adhesive with a wooden stick, then wipe them clean with rubbing alcohol. Let them dry completely before storing them in their original container.
Troubleshooting Specific Problems
If your press-ons keep popping off after a day or two, the problem is almost always inadequate prep. Make sure you’re buffing your natural nails, cleaning them with alcohol, and letting them dry completely before application. You might also need to switch from adhesive tabs to nail glue for longer wear, or add a nail dehydrator product to your prep routine.
If you’re getting lifting at the cuticles, you’re likely not pushing your cuticles back far enough during prep, or you’re applying the press-ons too close to the cuticle. Leave a tiny gap—about the thickness of a credit card—between the press-on and your cuticle. This prevents moisture and oils from your cuticle from seeping under the press-on.
Lifting at the tips usually means you didn’t apply enough pressure to the free edge during application, or you’re using your nails too roughly. Cap the free edge of your natural nail with adhesive or glue before applying the press-on, and make sure to press firmly on the tip area during application.
Side lifting often indicates sizing issues. The press-on might be too wide and touching your skin, or too narrow and not covering enough of your natural nail. Reassess your sizing and go up or down a size as needed.
Advanced Tips for Salon-Quality Results
For truly professional-looking press-ons, consider these advanced techniques. Use a nail dehydrator or primer on your natural nails after cleaning with alcohol but before applying adhesive. These products remove any remaining oils and moisture, creating an optimal surface for adhesion. Professional nail technicians almost always use primers.
Apply a thin layer of base coat to your natural nails and let it dry before applying adhesive tabs or glue. This creates an extra layer of protection for your natural nails and can actually improve adhesion. Some people also apply a thin layer of base coat to the underside of the press-on nail before applying glue.
For maximum longevity with glue, use the brush-on nail glue rather than the squeeze bottle kind. Brush-on glue allows more precise application and tends to be stronger. Apply it in thin, even strokes across your entire natural nail, then press the press-on nail on immediately.
Consider customizing your press-ons before application. You can paint them, add nail art, or apply rhinestones before attaching them to your nails. This is much easier than trying to decorate them while they’re on your nails. Just make sure any polish or top coat is completely dry before applying the press-ons.
The Bottom Line
Applying press-on nails properly isn’t difficult, but it does require attention to detail and patience. The key steps are thorough nail preparation with buffing and alcohol cleaning, careful sizing to ensure perfect fit, proper adhesive application with firm pressure, and allowing adequate drying time before water exposure. Master these steps, and your press-ons will last just as long as a salon manicure while costing a fraction of the price.
The beauty of press-on nails is that you can achieve professional-looking results at home with practice. Your first application might take an hour and result in nails that last a week. By your third or fourth set, you’ll be applying them in 30 minutes and getting two weeks of wear. The investment in learning proper technique pays off with gorgeous nails whenever you want them, without the time and expense of salon visits.
Remember that press-on nails are meant to be temporary and fun—don’t stress if your first attempt isn’t perfect. Each application teaches you something about your nails, the products, and the technique. Before long, applying press-ons will be second nature, and you’ll have beautiful nails ready for whatever nail art designs inspire you.
What’s your biggest challenge with applying press-on nails? Share your tips and questions in the comments below!